Showing posts with label recipes. Show all posts

Monday, August 13, 2012

Friday Night Fun

I've always been a firm believer in "date nights"...but I've also realized that so-called "date nights" aren't always possible, either.

After we got married, we set the goal of having one date night a month.  In our minds, we would pack up, head out of town for the night and go do something fun--maybe a concert, festival, a new restaurant, shopping...just something that we could do together.

After the second month, real life set in.  We were lucky to have a weekend evening where the both of us were around AND we hadn't already committed to something.  Eventually, "date night" started to fall to the wayside and we just started going through the motions of married life.

Finally, by this Spring, we realized we really needed to have date nights again.  As mentioned earlier, we were going through the motions but not really, truly enjoying time as just the two of us.  We had plenty of time with OTHER people, but as just the two of us???  Not really!

Thankfully, we were in the midst of the Lenten Season when we came to this realization.  For most people, that doesn't mean anything to them--but for us, that means we forgo meat on Fridays during Lent.  And in order to get my husband to eat a meatless dish, it's gotta be hella good...

And that brought our date nights back to life!  We would pick a new meatless, semi-gourmet meal to cook on Friday night...then, we'd spend the evening preparing the meal, plating it up and then just really sitting back and catching up.  It was so nice to have a conversation that went beyond who paid the water bill, if the laundry needed switched out and what errands had to be taken care of the next day!

But one thing was still missing.

The music!

Granted, we have music channels on our tv--but you can't control what they play!  And you just don't want to risk throwing off the flavor of your food because of bad tunes ;-)

As the months progressed, we tried to make due and use the time in the kitchen to talk and catch-up...but I knew we could still have more fun than that!

The other day, we ran to the movie store and by the door they had the best thing ever--a Crosley all-in-one player!

I have wanted one ever since we bought our bungalow.  They look like they're something straight out of the 1930's or 1940's--but rather it has all your modern features, too.

Well, mostly modern.

It has your AM/FM radio, mp3 port, CD player, cassette player AND a record player!

I knew we would like having a radio and cd player in the living room--but I knew we would really, REALLY enjoy having a record player for our date nights!

We picked up the Crosley player, unpacked it and set it up right away.  It was a perfect fit for the top of our china cabinet!


The next night was Date Night.  After work, we ran to the grocery store to pick up some appetizer stuff (more on that in a moment) and then we stopped in at our local music store in the heart of Aggieville.

We had a BLAST!  My parents collected records growing up so it was fun to pull the albums that they used to listen to.  They also had a bunch of the music that Justin grew up listening to--and all on vinyl!

Before we knew it, we had already killed an hour just looking at all the different albums available on record.  Justin grabbed several records and they were only $6 a piece!  I decided to put all my eggs in one basket and went for the new Norah Jones album--on WHITE vinyl, nonetheless!  Isn't it a beaut?!


We hurried home and put the first record on--we knew right away that we had found the missing piece to our date nights!  Some people would disagree with me, but there's something really great about hearing a song on vinyl, versus CD or mp3.  And heck, it's just kinda fun to watch the record go round and round!

Now, I can say our date nights are finally complete!  Good grooves, good food and good company--can't get better than that :-)

Oh--and about good food...here's the recipe we tried for our appetizer!  It's very inexpensive, super easy and quite filling.  We made it again the following night and Justin added pepperoni because, well, he could!  For those of you who know your spices, you'll appreciate that it came out of a Penzey's catalog!


Jenny's Tomato Bread
  • 1 loaf French bread, sliced lengthwise
  • 3 TB. butter (Mary uses unsalted)
  • 1/2-1 tsp. GRANULATED GARLIC POWDER (to taste)
  • 3-4 fresh tomatoes, thinly sliced
  • 1 tsp. KOSHER-STYLE FLAKE SALT (use 1/2 tsp. if starting with salted butter)
  • 2 TB. olive oil (I used grapeseed oil with great success)
  • 2 tsp. TURKISH OREGANO
  • 8 oz. sliced Mozzarella cheese

  • Preheat oven to 500°. Spread each slice of bread evenly with butter. Sprinkle with GARLIC. Line the tomato slices down the center of the bread. Note: if using juicy garden tomatoes, let the slices sit on paper toweling for a minute before using. Sprinkle with salt, olive oil and OREGANO. Top with cheese slices and place on a foil-lined baking sheet. Bake at 500° until the cheese melts and the bread begins to toast, about 5-10 minutes. If you wish to brown the cheese, put the oven on broil for the last minute, and watch carefully. Slice the bread into 4-inch sections and serve.

    Prep. time: 10 minutes
    Cooking time: 5-10 minutes
    Serves: 8

    Tuesday, July 24, 2012

    Peas--You Either Love 'Em or Hate 'Em

    Green peas.  What can I say?  You either love 'em, or hate 'em.  Growing up, we loved peas.  In fact, my Grandma Marcene made the best peas EVER.  They were laden with margarine and salt--and let me tell ya, we couldn't get enough of her peas!

    As an adult, I still love peas.  But to be  frankly honest, sometimes I get tired of them.  I haven't quite perfected my grandmother's salt-to-margarine-to-peas ratio, either.  So some nights, it's like "Seriously, why did I put peas on the menu?  I'm bored with peas!"

    But lately, I've been running into a new issue.  It's so hot that I just don't want warm side dishes.  Luckily, I stumbled across a new way to prepare green peas (score!) and it is a refrigerated dish (double score!)...and you should have most of the ingredients on hand.  In fact, it blends the best of many worlds: bacon, ranch and cheese!


    BACON RANCH PEA SALAD
    Ingredients
    • 4 slices bacon
    • 1 quart water
    • 1 (16 ounce) package frozen green peas
    • 1/3 cup chopped onions
    • 1/2 cup Ranch dressing
    • 1/2 cup shredded Cheddar cheese

    Directions

    1.  Place bacon in a skillet over medium-high heat, and cook until evenly brown. Drain, crumble and set aside.

    2.  Bring the water to a boil in a pot.  Boil the peas 1 minute, until just tender, and drain. Cool peas under cold running water.

    3.  In a bowl, toss together bacon, peas, onion, Ranch and cheese.  Refrigerate 30 minute or until chilled before serving.

    Friday, July 13, 2012

    Quinoa--Your Must-Have Pantry Staple and True "Super Food"

    Last night, I made a comment on Facebook about a new quinoa salad that I made and how I thought it ROCKED! And without looking, I'm pretty sure "rocked" was in caps on Facebook, too!  I'm not kidding--it was amazing!  But by this morning, it dawned on me again that not everybody knows what quinoa is...and that's okay.  Not many people do!

    We've been eating quinoa for several years now.  I have no clue how I came across it...I just did.  Maybe it was in some magazine article or online health forum???  Anyhow, I eventually found it at The Merc in Lawrence and ever since then, I've been hooked!  It's affordable, super healthy and super yummy--what's better than that?!

    Most people have two very basic, and to-be expected, questions when they first hear about quinoa.

    First--how do you pronounce it?

    Two--what IS it???

    To answer the first question, quinoa is pronounced "KEEN-wah."  Go through the checkout line of the natural food store pronouncing it, "Kwin-O-uh" and the clerk is guaranteed to look at you like an idiot.  Trust me :-)  If it takes some time to get the pronunciation down, that's okay--there's days where part of me still wants to slip back into the kwin-o-uh days and then I remember the embarrassing stare...

    Secondly, quinoa is usually described as a grain.  I even catch myself describing it as a grain, when in all actuality, it's really a seed.  It looks a bit like couscous and is as versatile as rice (one reason why I love it so much!), but it has a richer, nuttier flavor than either of them.

    Quinoa is a native of the Andes in South America and it was first cultivated by the Incans.  They ate quinoa to supplement their diet of corn and potatoes.  European immigrants to South America were slow to incorporate the seed into their cuisine and it has only recently been 'rediscovered.'  So, if this is your first time hearing about quinoa, don't feel bad ;-)

    Because if its nutritional content, quinoa is touted as a "Super Food."  It happens to be a complete protein, and has all 9 essential amino acids so it is actually a great staple for vegetarian diets.  Like I mentioned above, quinoa can be exchanged for rice in recipes and in my opinion, it's even better than rice :-)  And for those of you interested in the nutritional value of quinoa versus rice, check this out:

    BASED ON A 1/2 CUP SERVING:
    Carbs: Quinoa 63g, brown rice 72.8g, white rice 79g
    Protein: Quinoa 13.1g, brown rice 7.5g, white rice 6.6g
    Fiber: Quinoa 5.9g, brown rice has 3.4g, white rice 0
    Fat: Quinoa 5.8g, brown rice 2.68g, white rice 0.58g (The two cereals have largely unsaturated fat which has nutritional and health benefits.)
    Iron: Quinoa 9.25mg, brown rice 1.8mg and white rice 0.8mg


    Apart from the health benefits already mentioned, quinoa happens to have a low glycemic index compared to other whole grains. The glycemic index – or GI – rates food based on how much they make your blood sugar rise. Keeping your blood sugar steady and balanced can help you to maintain weight and improve cholesterol – that’s why whole unprocessed foods that are low in sugar and high in fiber (like whole grains) are touted for their health benefits. Calorie-wise, quinoa also comes in about 50 calories less per serving compared to brown rice.


    For the curious, this is what quinoa looks like as it's plant is grown...isn't it gorgeous?!  In fact, it kinda reminds this farm girl of milo!  My true-farmer brother would probably argue that comment down, but that's just my opinion :-)


    When the plant and seeds are eventually harvested, this is what the quinoa looks like:


    After you buy your quinoa at the store and prepare it at home, this is what the cooked version looks like:

    Quinoa is generally sold in two different ways at the grocery store (that is, if your store carries it).  In the Little Apple, our bigger grocers provide both options.  Fortunately, our smaller grocers are starting to carry it but it's only available in the latter option. 

    The larger stores will offer quinoa in their bulk section.  The price may vary based on the distributor, but you can expect somewhere around $3.49/lb (or $0.22/oz).


    The other way is in a box.  Like I mentioned above, most stores will at least have the pre-packaged quinoa--but it comes at a premium.  Let's try an average of $6.99 for a 12oz box (or $0.58/oz) on for size!  The upside is that you can pick from a variety of colors when you buy the boxed quinoa.  A lot of times you have the traditional white, Incan red and even a black version to pick from.  But....we're cheap and we buy the traditional white from the bulk bins!


    So, what do you do with quinoa???  Quinoa can be served on its own as a side dish, with a bit of butter or oil, salt and pepper, or other seasonings. It also makes a great breakfast dish mixed with dried fruit, cinnamon, milk, and maple syrup or honey. Paired with chili, stir-fries, beans or curries, quinoa is a healthy substitute for rice (it also makes a tasty pilaf). As a main course, use it to make meat-free burgers, mix it into stews or toss it into salads. Quinoa works as a baking grain aswell, and makes for delicious and nutritious breads and muffins.  Considering the nutritional benefits and versatility, you'd be silly NOT to make quinoa a staple in your pantry!

    To make it even MORE tempting for you to give quinoa a try, here are some recipes worth trying!  Not only are the pictures incredibly appetizing, BUT the links are RIGHT THERE!  All it takes is just one click and you'll be captivated by a whole new world of super-food possibilities!  I have personally made most of the recipes below and I promise you, you won't be disappointed :-)


    SEAFOOD SALAD with LEMON VINAIGRETTE
    Quinoa, avocado, black beans corn & shrimp. yum!

    QUINOA and SUMMER VEGETABLE SALAD
    http://mychiclife.com/2012/03/07/quinoa-salad/
    (this is what I made last night!  We used chicken broth, cucumbers, cherry tomatoes, green onion, chickpeas and balsamic dressing and were in HEAVEN!!!)


    QUINOA with PEAS


    MANGO BLUEBERRY QUINOA SALAD with LEMON BASIL DRESSING


    BACON QUINOA with ALMONDS AND HERBS


    CORN and EDEMAME QUINOA SALAD


    BROCCOLI QUINOA CASSEROLE


    SANDRA LEE'S QUINOA SALAD


    Wednesday, May 16, 2012

    A Yummy Taco Pizza Recipe!

    Okay, ladies and gents--I think I've found a great way to use up your leftover taco meat! 

    For all of you who are from a small town, you probably remember the Taco Pizza from Pizza Hut.  What is there NOT to love about that pizza?!  When I was in college, I would order a large thin-crust and have it for breakfast throughout the week.  Looking back, it probably wasn't the healthiest way to start the day, but it was totally worth it :-)  By the way, did you know that you can't find the Taco Pizza on their online ordering site???  You have to order your pizza the old-school way, by picking up the phone and calling them!  Gasp!


    To this day, I still love their Taco Pizza...but, with having to cut wheat out of my diet, that means I can no longer order it (insert sad face here).  As a result, I've been playing around with various ingredients and I have finally found a recipe that will give Pizza Hut a run for their money!  It's super easy to make and you can use either a regular pizza crust or a gluten-free pizza crust.

    So, if you're in the mood for a Taco pizza fresh from your own oven, this is what you need:

    Taddy-Long-Leg's Taco Pizza
    1 Pizza Crust (I prefer a thin crust)
    Refried Beans (I used fat-free with great success)
    1/2 lb. taco meat
    Canned enchilada sauce (this is the "secret" ingredient--don't skip it!)
    Shredded lettuce
    Shredded cheddar cheese
    Sliced green onions

    Spread a thin layer of refried beans over your pizza crust--add taco meat.  Drizzle enchilada sauce over the bean and meat mixture (make sure you shake the can well before opening it).  Top with shredded lettuce, cheddar cheese and sliced green onions.  Bake according to directions on pizza crust packaging.  Then, enjoy!

    Thursday, May 3, 2012

    A Twist on Traditional Meatballs--Mongolian Style


    Several weeks ago, I received an email from one of the many listserves that I am subscribed to.  Usually, I don't even open the email (Hey, give me a break--I'm no longer involved in the group!) and it goes directly to my trash folder.  For what ever crazy reason, that day I decided to open the email and I'm glad I did!

    The gal mentioned she would be bringing Mongolian Meatballs to the meeting.  My first reaction was, "What the heck are Mongolian Meatballs?!"  Naturally, I went on Pinterest and much to my surprise, I didn't find anything :-(  If it wasn't on Pinterest, did Mongolian Meatballs really exist?!  I was starting to panic.

    I did the next best thing that any smart person would do.  I googled "Mongolian Meatballs" and again, I was surprised by the results.  But this time around, I was pleasantly surprised.  Google actually found BUNCHES of recipes!  I read through a few and there were huge variations.  One recipe called for a mixture of ground meats--beef, lamb, pork--and super exotic spices plus all-day-long cooking methods...others called for 1 type of ground meat, an egg and a pressure cooker.  The anxiety really started to set-in.

    Eventually, I found one that seemed to be my middle-of-the-road recipe.  It called for simple ingredients and didn't require too much of my time.  Plus, the blogger is a professional chef turned Stay-At-Home-Mom.  If I have learned anything in my life, SAHM's are generally amazing cooks.  And combine that with a SAHM who is a chef?!  I knew this recipe had to be good.

    I finally got around to trying the recipe the other night.  As I put everything together, I started to have some serious doubts.  Especially, with the bottled hoison sauce.  There's rarely a time that I use the bottled stuff and I actually end up liking the recipe :-/  I'm not sure what it is, but the flavor always seems very far from authentic.

    Anyhow, I was too far into the recipe to call it quits.  I put the meatballs in the oven, prepped the vegetables, started the rice and hoped for the best.  If it turned into an epic fail, it wouldn't be the first time we had placed a delivery order after trying a new recipe!

    Finally, everything was ready and we plated up the food.  I took one bite and was quite amazed!  The meatballs were actually good.  And not just good.  But delicous!

    I decided to let the husband try a few bites before I would ask "Well, whatdya think?"  But before I even had a chance to ask, he said, "Wow!  What are these meatballs?  They're really good.  Can we have them again?"

    Well, that was a huge change from his usual, "Oh--they're fine" response!  This recipe will definitely have a home in our "For Keeps" file.  If you're up for trying an easy and delicious variation on your typical meatballs, give this recipe a try!  The original recipe can be found at http://sahmchef.blogspot.com/2011/07/mongolian-beef-meatballs.html; I made only a few minor changes and "my" version is below.  Enjoy!

    Image courtesy of The Stay-at-Home-Mom Chef

    Image courtesy of The Stay-at-Home-Mom Chef

    Mongolian Beef Meatballs
    Yield: 4 to 6, depending on who you're feeding--or 2, if it's J-Money and me:)

    Ingredients:
    1/2 C hoisin sauce
    1/4 C soy sauce
    1/4 C brown sugar
    1 t garlic powder
    1/2 t ground ginger
    1/4 to 1/2 t red pepper flakes (adjust the heat to your taste)
    1 egg
    1/2 C plain bread crumbs (I used crushed corn flakes)
    1 pound ground beef
    2 bunches green onions, sliced on the bias into 1 inch pieces
    1 C matchstick cut carrots
    vegetable oil

    In a mixing bowl, combine the hoisin, soy sauce, brown sugar, garlic powder ground ginger, and red pepper flakes. You should have 1 liquid cup. Remove all but 1/4 C from the bowl and set aside.

    Whisk 1 egg into the sauce in the mixing bowl, then add the ground beef and bread crumbs. Combine with your hands as you would a meatloaf or other meatball, then shape into ping pong ball sized meatballs. You should get 24 (we made our's larger and had about 14)
    Bake in a preheated 250 degree oven on a parchment lined baking sheet (or broiler pan) for about 20 minutes until done. Because mine were on the larger side, I baked them for about 20-25 minutes at 350 degrees.
    In a large skillet, heat one turn of the pan of vegetable oil to rippling hot. Add the carrots and cook 1 minute. Add the green onions and cook 30 seconds. Add the meatballs and reserve 3/4 C sauce, toss to combine, and cook for 1 minute more, until hot. Serve immediately with cooked rice.

    Wednesday, March 21, 2012

    A Super Easy--and yummy--Philly Cheese Steak Sandwich!

    I have to admit it--I love Pinterest!

    My pre-Pinterest existence kinda reminds me of what life was like before the advent of the World Wide Web--we lived life and were oblivious to all the potentially excellent resources that existed elsewhere in our world.  Because, frankly, we just didn't know any different.

    Not only do we now have the Internet at our fingertips, we can connect with sites we have never heard of thanks to Pinterest!  And it always amazes me how one site's single posting can go viral and half the world is on a Cinnamon Roll Cake/Spray Painted Bottles/Fitness Routine kick...

    For me, my favorite part of Pinterest is becoming introduced to new resources...and so far, it has been worth the time that quickly slips away when you're on Pinterest.

    Case-in-point, I was reviewing a friend's pin because 1--I wanted to see if the pin actually linked to the information (it drives me nuts when I see something very useful but the link is dead, so I refuse to repin) and 2--it claimed the pin was from a site I had never heard of.  So, of course, I was naturally curious!

    And boy, am I glad I clicked on that pin!  I can't even remember what the original pin was for, but in browsing the site, I found a super easy AND yummy recipe for Philly Cheese Steaks.

    I love, love, love Philly Cheese Steaks.  As I child, I used to request them for my birthday dinner and I remember my mom tediously slicing up all the steak.  In my adult years, I have really come to appreciate my mother's willingness to do that!

    If you're a Philly Cheese Steak person--or you just want a quick meal that everyone will like, you have to try this recipe.  The original creator calls them "sloppy-joe" style Cheese Steaks and I know it's because of the ground beef that she uses...but don't let that deter you!  If anything, you'll save a few extra bucks buying ground beef instead of steak :-)

    Photo Courtesy of Chef In Training
    PHILLY CHEESESTEAK SLOPPY JOES
    Recipe adapted from Chef In Training, original source 'A Taste of Home Cooking'

    1 lb. ground beef
    1 softball-sized onion, chopped
    1 green pepper, chopped
    2 T. A-1 steak sauce (we used a little more for extra kick)
    1 C. beef stock
    Salt and ground black pepper
    4 dinner rolls
    1 T. butter
    1 T. flour
    1 C. milk
    1 C. provolone, shredded

    In large skillet over medium-high heat, brown the ground beef (about 5-6 minutes). Add the onion and green pepper and cook another 3-4 minutes, until the vegetables start to get tender. Stir in the steak sauce and beef stock, season with salt and pepper, bring up to a bubble and cook about 2 minutes.

    Split open rolls and remove most of the soft insides, leaving a bed to hold the meat mixture. Toast the rolls and set aside.

    While the meat is cooking, melt the butter in a medium-size pot over medium-high heat. Stir in the flour and cook about 1 minute. Whisk in milk, bring up to a bubble and let thicken, about 2 minutes. Turn off heat and stir the cheese.  We skipped this step--I just melted a bit of Velveeta with a splash of milk and not only did it save time, it complimented the meat mixture very well.

    To serve, place a scoopful of the meat mixture onto the bottom of the rolls, then top with the cheese sauce and replace the top of the roll.

    Saturday, March 3, 2012

    A Super "Corny" Recipe

    The other night as we folded laundry, I turned the channel to Jersey Shore...I had never seen it before and I was a little curious as to why my 6th and 8th grade students LOVED the show.  I figured it was time to be a good teacher and check it out ;-)

    After about 10 minutes, I had had enough!  It reminded me of a new-age version of The Real World...but 10x more inappropriate! 

    But there was one thing about the show that honestly made me laugh--the acronym "GTL."

    Once upon a time, when I was still single and living in the heart of our nightlife district, that acronym fit me to a T!!!  I did nothing but "Gym, Tan and Laundry"...

    I was just out of college, living in a super sweet, newly-constructed apartment complex.  Two doors down from my building was a gym.  The only thing that stood between myself and that gym was a liquor store and bar...

    When the work day ended at 5pm, I headed straight to the gym...an hour or so later, I would go home to make some chicken strips or meet my friends for a quick drink at the bar.  The classy part?  I was not above going out for a drink in my gym clothes ;-)  Looking back, that was so totally gross....

    After I was done with my chicken strips or my drink, I would walk 1/2 a block in the opposite direction and jump in the tanning bed for 20-minutes...and if I needed an extra boost of color, I would slather on the self-tanner before the weekend's festivities.  As my brother said to Justin the first time they met, "You thought she was a Mexican, didn't you?!  Look at the rest of us--we're all white! Bwhahahaha!"  Gotta love my baby brother for saying what everyone else is thinking :-)

    When I look back at pictures from 5 or 6 years ago, I'm amazed at how thin I was...and how tan I was...but then a husband happened and it all went down the tube!

    Nowadays, I'm freaked out by tanning beds--not only have I caught as many skin infections as humanly possible from tanning beds, but the CANCER risk.  But I'm also too cheap and busy to keep up a decent spray-tan...the other side of things is Justin refuses to eat "single girl food."  Apparently, 3 chicken strips does not constitute a meal for him!  Sooo, hearty meals, fleshy hips and jiggly thighs it is!

    Here is a prime example:  I had a recipe for Roasted Corn Enchiladas that I had bookmarked several months ago.  When I went to pull it up yesterday, the link had expired!  I was kinda freaked out...it was Friday, and a Friday during Lent at that.  The other meals left on our weekly meal plan all had meat in them.  I HAD to figure something out!

    I did a few Google searches and found a basic corn enchilada recipe and a recipe for a corn sauce.  We had all the ingredients on hand and with a little bit of improvising, I was sure we could make it work.

    Omigod.  The enchiladas turned out uh-mazing.  My meat-loving husband didn't even care that they were basically "vegetarian."  In fact, he said he would be willing to eat them even when Lent is over!  And please--I don't know how to say this without sounding like I'm bragging, but they were good enough to be served at a restaurant!  I promise you--you have to try these enchiladas and you will NOT be disappointed!  Well, that is, if you like corn because these are super corny!  If you want to save some time and have some fun while you're at it, grab someone to help you in the kitchen and the recipe will be ready in no-time :-)  And hopefully you'll have enough time left over to do a few minutes of cardio to burn off all the cream and fat you will consume!!!  lol...

    Roasted Corn and Black Bean Enchiladas

    8-9 corn tortillas
    Bunch green onions
    1 T. olive oil
    2 garlic cloves
    Bag of frozen corn/black beans blend (defrosted) + 1.5 C frozen corn (defrosted)
    1/4 C. chopped Poblano Pepper
    1.5 C heavy cream
    1 T. butter
    1/2 C. dry white wine
    2 C. shredded Pepperjack Cheese
    Appx. 1/4 C Red Enchilada Sauce
    Blackening Seasoning
    Cilantro (optional)

    Preheat oven to 350 degrees.  Warm 1 Tbsp. oil in large skillet over medium-high heat.  Add corn/black bean blend + 1/2 C. of the frozen corn; stir until warmed through.  Add 2-3 chopped green onions and the garlic, saute until fragrant (about 1 minute).  Add 1/2 C. heavy cream and approximately 1 T. of blackening seasoning to the mixture; cook, stirring occasionally, until thickened, 7 to 10 minutes (if you like cilantro, add some to the mixture before it gets too thick).  Season with salt and remove from heat.  This is about what you want it to look like:


    While you make the corn and black bean mixture, have your partner make the sauce. In a frying pan, melt the 1 T. butter and add the remaining green onions (make sure they're chopped) and the diced poblano pepper. When tender, add the remaining 1 C. of corn. Cook a minute or two and add the white wine. Boil to reduce the liquid by one-third. When this happens, stir in the remaining 1 C. of cream and bring to a boil again (watch the cream VERY closely!). Season to taste with salt and pepper. In a blender, puree 2/3 of the sauce. Make sure to hold the lid down because the steam will create enough pressure that it could pop-off and explode sauce everywhere. Stir the pureed sauce back into the 1/3 remainder.  This is what the sauce will look like:


    Once the filling and sauce is made, is time to start preparing the tortillas. Add about 1 t. of olive oil to a skillet warmed over medium-high heat and stir the oil around. Add a tortilla to the skillet and let cook for about 30 seconds. It doesn't take very long for tortillas to cook so keep a close eye on them. You don't want your tortilla to get crispy; just warm it in the oil and watch for a few brown spots to appear. When that happens, flip it to the other side and do the same thing. Once it's ready, drain the tortilla on paper towels.  Repeat this process (adding new oil to skillet each time) with each tortilla.  It's best to fry them up as your partner is filling them.
     
     
    Now, add a bit of the corn and black bean mixture to the tortilla; top with a bit of the Pepperjack Cheese.  Trust me--it's worth the time it takes to shred it yourself.  Not only is it cheaper by the brick, but it melts 10x better! 

     
    Roll the enchilada up and prepare your baking dish.  You will need a 9x13 pan; add approximately 1/4 C. red enchilada sauce to the bottom of the pan.  You don't want very much--just enough to cover the bottom of the dish.  NOW, you can add your enchilada to the baking dish--make sure you place it seam-side down to prevent the enchilada from opening up.
     
     
    Once all the enchiladas are made and placed in the baking dish, pour your corn sauce on top.  Sprinkle with remaining cheese.  We had enough filling to make 9 enchiladas.


    Bake in the preheated oven until bubbling, about 20 minutes.  After eating, make sure you hit the G in GTL for at least another 20 minutes and repeat again, if necessary ;-)

    Tuesday, February 14, 2012

    Recipe of The Week: Chicken Chimichangas with Green Sauce

    I've said it before and I'll say it again...I LOVE Mexican food!

    One of my favorites is a good ol' cheesy, deep-fried Chimichanga...they rock my socks off!

    I'm always up for a culinary adventure but really, making chimi's at home has always sounded like a lot of work.  If a recipe is very time consuming, it automatically gets put in the "weekends only" file and based on how busy our weekends are, the recipe may never be used.

    Just the other day, I ran across a Chimichanga recipe on Allrecipes.com that looked pretty good, had positive reviews and seemed like something I could modify to make a heck of a lot easier/quicker...which I did! 

    I finally made it the other night and it was DELICIOUS!  They also fried up pretty easily and without making a huge, greasy mess--another plus!  The recipe makes a significant amount of filling--we had enough for at least 2 meals.  The first time around, we did just the chicken and cheese--then the second time, we added sauteed onions, peppers and tomatoes to the mixture.  We're pretty sure they were even better the second time around ;-)

    For those of you who also appreciate a good Chimichanga (and maybe need a last minute meal for Valentine's Day!), here's my version of the recipe:


    Photo Courtesy of Allrecipes.com
    Chicken Chimichangas with Green Sauce
    1 (10.5 ounce) can condensed cream of chicken soup
    1 (4 ounce) can diced green chiles
    2-3 pitted green olives (I skipped these)
    1/2 jalapeno pepper, seeded and chopped
    2 T. fresh lime juice
    1" cube of pepperjack cheese
    1 (8 oz) package cream cheese
    1 (8 oz) package shredded Monterey Jack cheese
    1/2 (1 oz) package taco seasoning (I used Mrs. Dash's Fiesta Blend)
    3 chicken breasts
    8 (10 inch) flour tortillas
    Vegetable Oil
    Various toppings: guacamole, sour cream, shredded cheese, etc

    Place chicken breasts in crock pot and add taco seasoning/Mrs. Dash,1 tablespoon of lime juice and 3 tablespoons of water.  Cook on high for 3.5 hours or until chicken is done.  Remove chicken breasts from crock pot and shred.  In a separate bowl, stir together the cream cheese and Monterey Jack cheese until well blended.  Fold in chicken and add several spoonfuls of chicken juice, if you wish.  Pour the cream of chicken soup, Pepperjack cheese, green chiles, olives, jalapeno and remaining 1 tablespoon of lime juice into a saucepan; warm over medium-low heat, stirring occasionally. 


    Evenly divide the chicken mixture among the tortillas.  Fold each tortilla into a rectangular packet around the filling. Heat the vegetable oil in a large skillet over medium heat. Place 2 chimichangas at a time in the oil, seam-side down (this keeps them from coming open), and fry until golden brown.  Remove from oil and drawn on paper towels.  Ladle warm sauce over the chimichanga and add any toppings of your liking.

    Sunday, January 15, 2012

    Recipe of the Week: Sweet 'N Tangy Meatballs

    Are you ready for another delicious recipe that I just discovered?!

    I probably shouldn't admit that I just came across the recipe because based on my internet research, it's been around forever.  However, I will admit that I was both curious AND concerned about the recipe.  The recipe only called for 3 ingredients, a slow cooker and almost seemed too easy to be true.

    Anyhow, we had a potluck dinner after Church today and I needed something quick and easy to take.  Throughout the week, I thought about making some other dishes that go over well at potlucks but I kept coming back to this recipe.  Almost always, the mention of a slow cooker seals the deal for me!

    As we were loading up the crockpot of Sweet 'N Tangy Meatballs into the car this morning, I confided in Justin my worries about serving a recipe that I have never prepared to a bunch of people.  Knowing my luck, the meatballs would turn out to be an epic fail and everyone would see my leaving with my nasty potluck dish!

    Thankfully, I was dead wrong.  We came home with an empty crock-pot!  I saw several people go back for more and they had already disappeared.  Being the "helper" that I am, I divulged the recipe--they couldn't believe how easy the meatballs were!  Especially since they were quickly kid-approved by all the young tikes.


    The recipe called for 3 very basic ingredients:


    All you do is dump a big bag of frozen meatballs in the slow cooker and pour in a 12-oz bottle of grape jelly and a 10-oz bottle of chili sauce.  Cook everything on low for several hours and you're ready to go.  It's really THAT easy!

    After reading some reviews,  I decided to play with the recipe a bit.  I added 1 teaspoon of Worchestershire sauce and 1 teaspoon of ground mustard to everything.  I also cooked the meatballs on high for about 1 hour and then turned it down to low until it was time to eat.  By then, the jelly and chili sauce had penetrated the meatballs and they had tons of flavor!  Surprisingly, they weren't really sweet.  So I don't know why the recipe called them Sweet 'N Tangy--if it were up to me, I would call them "Don't-Count-On-Any-Leftovers People Pleasers."

    I also read some reviews where they substituted Apricot preserves for the grape jelly--I can't wait to try that version, sometime!  Some people also used an Asian Chili sauce to give it more kick--again, I can't wait to try that as well!  To make a meal out of the meatballs, many people reported serving them over rice. 

    Whatever you end up doing, just make sure you decide to try these People Pleasers--you (and all the other mouths) won't be disappointed!

    Saturday, January 7, 2012

    Recipe of the Week--Lettuce Wraps and (Baked) Crab Rangoon!

    I have to be somewhat honest here--these recipes aren't necessarily "new" to us...however, I came across them not too long ago and we made the Lettuce Wraps and Crab Rangoon just last week so they're fresh in my mind. And I'm already craving them again!


    I love a good Lettuce Wrap. PF Chang's are amazing but we rarely ever are near one. I'm telling ya, these wraps are VERY similar to the ones served at PF Chang's! I've tried various recipes over the years and this one is here to stay. Oh, and you HAVE to make the dipping sauce--it's spectacular! And super easy :-) One thing I should mention--don't be intimidated by the length of the ingredient list. Everything comes together super quickly and if you're willing to spend the extra money, you can get most of the produce items in already-prepared forms.

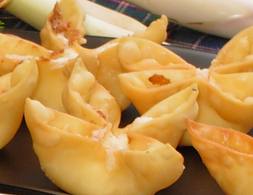
    Now--the Crab Rangoon. I'm not trying to brag, but I've been known to make a great Crab Rangoon. In fact, I about burned down our apartment building frying up a bunch of them for the neighbor boys several years ago. But it was totally worth it :-) One of my secrets involves REAL crab...not that imitation kind...or even the kind in a can. I'm talking the fresh crab from the meat section. You can buy a plastic cup of it for about $6 and it will go a really loooooooong ways--trust me. And my other secret--CHIVE cream cheese. Not the regular cream cheese, but the Philadelphia kind with the chives already in it. The recipe I posted below also calls for Sriracha Chile Sauce (aka Rooster sauce) but if you're not one for spice, you can totally skip it and still have a killer Crab Rangoon!


    Asian Lettuce Wraps (Recipe by Our Best Bites)
    2 t. canola oil
    4 cloves garlic, minced
    1 T. minced fresh ginger
    1 lb ground chicken
    3 oz. mushrooms, finely chopped (about 8 small mushrooms)
    1/2 t. kosher salt
    4 C bagged coleslaw mix or thinly shredded cabbage
    8oz canned sliced water chestnuts, drained, rinsed, and finely minced
    1/2 C thinly sliced green onions
    4 T. soy sauce
    1 t. sesame oil
    1 lemon, zested and juiced (about 3-4 Tbs juice)
    1/2-1 t. Sriracha or other hot sauce (1 tsp of Sriracha is fairly spicy in my opinion, so if you want less or no kick, just give it a little, or you can leave it out completely)
    1/3 C roughly chopped cilantro
    1-2 heads iceberg lettuce


    Dipping/Drizzling Sauce:
    4 T. soy sauce
    4 T. rice vinegar
    3 T. water
    2 t. honey
    1-2 t. finely minced fresh ginger

    Heat a very large skillet to medium-high heat on the stove top. When hot, add vegetable oil and then garlic and ginger. Saute for about 30 seconds, until fragrant, and then add ground chicken, chopped mushrooms, and kosher salt. Cook for about 5 minutes, stirring often, until chicken is cooked through. (*At this point, sometimes I have some extra liquid in the pan from the chicken. If it’s quite a bit, I tilt the pan and spoon it out so the chicken can cook and not boil.) Add cabbage/coleslaw, water chestnuts, and green onions. Cook for about 2 minutes, until cabbage starts to wilt. Add soy sauce, sesame oil, the zest from the lemon and the lemon juice, and hot sauce to taste. Remove from heat and stir in cilantro.


    To prepare dipping sauce, combine all ingredients and whisk to combine.


    To serve, carefully remove the individual leaves from the head of lettuce. (The closer you get to the center, the easier it becomes!) Place chicken mixture in the leaves and serve with sauce.  Yield: about 5 C chicken mixture. Makes 14-16 lettuce wraps.


    Sriracha Spiked (Baked) Crab Rangoon
    1 pkg. Wonton wrappers
    4 oz. cream cheese, at room temperature (I prefer to use the Philadelphia Chive variety)
    2 - 2 1/2 t. Sriracha chile sauce
    1/2 t. soy sauce
    3 T. finely chopped green onion (you don't need this if you use the Chive cream cheese)
    1/4 t. black pepper
    1/4 t. grated lemon zest
    4 oz. well-drained lump crab meat (trust me, it's worth it to splurge for the real stuff!)
    Salt, to taste


    To make the filling , combine the cream cheese and chile sauce (to taste) in a bowl. Add the soy sauce, green onion, pepper, lemon zest, and crab meat. Use a fork to mix well. Taste and add salt, as needed. Cover with plastic wrap and set aside for 30 minutes before using, or refrigerate up to a day in advance.


    Fill each wonton skin with about 1 teaspoon of the filling. Center the filling, brush two adjoining sides with water, then fold to create a triangle. Place on a baking sheet coated with non-stick cooking spray. You may also want to spray the wontons with nonstick cooking spray to help brown them.


    Bake at 425 °F (210 °C) for 8-10 minutes or until golden brown (you may need to flip them half-way through the baking time so that they brown evenly). Or you can just fry them in hot oil--but baking them makes ya feel a bit more healthy. Serve warm.


    *And if you don't like spice at all, feel free to omit the Sriracha...you will still have a very yummy, and traditional, crab rangoon!

    Tuesday, January 3, 2012

    How To Make a Jar of Good Luck!

    Every year, I struggle with coming up with gifts to give co-workers and friends.  It's always such a conundrum--I don't want to go overboard on the gifts and make people feel bad...some people love sweets, other people would kill me if I gave them more candy or carbohydrates...and I would prefer to give something home-made...but usually, I draw a blank and/or run out of time so I just don't do anything!

    This year, however, I finally figured out a gift that EVERYBODY should appreciate.  I bottled up a lil' bit of  good luck and prosperity and put it in a jar!

    By this point, you may be asking yourself, "And exactly how does she do that???"

    It's easy.  All you need is black-eyed peas!

    And how do black-eyed peas equate good luck and prosperity?!

    Walk into most any Southern kitchen on New Year’s Day and there’ll be a pot of black-eyed peas on the stove or a dish featuring some form of black-eyed peas on the table. The peas are thought to be African in origin and have been a mainstay of the Southern diet for over 300 years. One popular theory on the marriage of black-eyed peas and good luck dates back to the Civil War, when Union troops stripped the countryside of food, crops, and livestock, and destroyed whatever they couldn’t carry away. At that time, Northerners considered field peas and field corn suitable only for animal fodder, and didn’t steal or destroy these humble foods, thus leaving food for Southerners to eat during the conflicts bleakest days. And that’s good luck.

    The jars of good luck are easy to prepare.  All you need is a quart-sized Mason jar, a pound of black-eyed peas, various dried seasonings and a way to attach a recipe.  And then it's time to spread the love!  Errr, luck! 

    Most often, black-eyed peas are prepared as Hoppin' John on New Year's Day...but, knowing most of the recipients are true Midwesterners, I changed up the attached recipe some.  I included a recipe for Black Eyed Pea Soup--but whenever we make it, we throw in some pig and then drain off the excess liquid and serve it over white rice...nothing beats a big old bowl of soul food!

    In case you're interested in bottling up your own bit of good luck and prosperity, the detailed directions and recipe are below!


    GOOD LUCK & PROSPERITY IN A JAR
    3 1/2 cups (1lb) dried black eyed peas

    For Seasoning Packet:
    1/2 cup dried minced onion
    6 T. chicken bouillon granules
    2T. dried parsley flakes
    1 T. sugar
    2 tsp dried minced garlic
    1 tsp chili powder 1 tsp onion powder
    1/2 tsp pepper
    1/2 tsp garlic powder

    Add 2 cups of the peas into a wide mouth 1quart canning jar. Mix and place the seasoning in a small plastic bag. Place the packet on top of the peas. Add the remaining peas.

    Attach this to the Jar:

    Black Eyed Pea Soup
    Remove seasoning packet and set aside. Rinse peas and place in microwave safe dish. Cover with water, 1 to 2 inches over the top of the beans. Cover the dish loosely with plastic wrap and microwave on high for 15 minutes, rotating after 7 minutes. Drain and rinse beans. Place beans in a large soup pot. Add 12 cups water, 2 (14oz) can of diced or crushed tomatoes & Seasoning packet. Cover, bring to a boil. Lower heat, cover and simmer 1 1/2 hours or until beans are tender. Stir Occasionally.