Showing posts with label home decor. Show all posts

Friday, May 4, 2012

My Fern Fury

I did something really dumb this year...

I wintered my precious, precious ferns :-(

When I found out about a local wintering program this past Fall, I was ecstatic.  I was on my second set of hanging Boston ferns (the first set didn't make through our unusually cool Spring) and they were thriving.  I was worried about keeping them inside our house for two reasons.  One--I wasn't sure if we had the proper lighting levels and two--I didn't want to deal with the constantly shedding fronds.  I knew that by wintering ferns, they obviously wouldn't die, but they would continue to grow and just get bigger, and  bigger and BIGGER.

I have to admit that when looking at this picture, they don't seem THAT big.  This picture was taken in the summer time and they had grown even more before I took them to the greenhouse.  In fact, I could only fit one of them in the backseat of my Altima, if that says anything about how large they had gotten!


I took my sweet, precious ferns in around late October and picked them up in early April.

I thought I was going to cry by the time it was all said and done.

When I walked into the greenhouse, I saw two itty-bitty, wimpy ferns planted in old buckets sitting by the door.  I didn't pay them much attention because heck, mine were insanely huge compared to those!  In fact, I kinda felt sorry for whoever was getting those ferns!

I filled out the paperwork, paid the bill and asked where my ferns were--I was so excited to have my "babies" back!  The gal said, "They're right there!" and pointed at the wimpy ferns planted in the bucket...I looked at the ferns, then looked at her and said, "Uh, those aren't my ferns."

After a few minutes of trying to convince her that those were not my ferns, she showed me the stake that had been stuck in the dirt.  Lo and behold, my name was on the stake.  I explained to her that my ferns were huge--like, big enough that one of them alone took up an entire backseat--and had been in hanging baskets...not buckets.  I was convinced that someone had gotten a set of ferns confused and some lucky person walked out with some impressive "growth" in their ferns.

She explained that my roots had outgrown their hanging baskets--which, I didn't doubt one bit.  Thus, they transplanted them into the buckets and clipped off all the dead foliage.  I knew my ferns had a few dry fronds, but enough to trim them down to absolutely nothing?!?!  I wasn't buying it.

In fact, I'm still not buying it.  She tried to ease my fears by saying there are "millions" of babies just waiting to pop up--again, I don't doubt that one bit.  But I thought the point of wintering plants was to have them ready to put on display when the weather was nice again!

At this rate, I'm not sure when the ferns will be big enough to hang.  I could go ahead and do it, but they'd look so ridiculously unproportional to our porch.  Just thinking about it starts to bring tears of fury and disappointment to my eyes.

My two ferns in their new "home" on the porch floor.  I have to admit, they HAVE grown since I picked them up a month ago--but they're still nowhere close to their original size.  Oh, well!

Ever since picking up the ferns nearly 1 month ago, J-Money and I have been going round and round about buying a new set.  Of course, I want to get two new ones--and it really didn't help any when all the local stores starting bringing out their big ol' full ferns.  It was like they were just rubbing it in my face!  Justin keeps telling me to be patient and accept that at some point, they'll be big again--and my response is, "Yeah, like next year."  I want my ferns NOW!  And yes, I am being a whiney little kid about it :-)

Finally, last night, J-Money gave in.  I got my mileage reimbursement check in the mail and it was a whopping $25.  Yeah, gas is $4/gallon, but you know our reimbursement rate still bites when I'm getting paid $25 for all the driving that I do.  I digress...but anyhow, Justin told me that I could take the reimbursement money and go buy a set of new ferns.  So, I did.  Yayyyyyyyyyyyyyyyyyyyyyy!

In all situations, I try to find the positive.   I figure this experience may actually end up working out very, very well.  My need for instant gratification was met when I picked up my new set of ferns...if the wintered ferns ever catch up, then I'll have the 4 hanging ferns that I always wanted!  Then, our porch will really feel like the Southern porch that I want to create for my husband.  Granted, I'm not sure what I'll do with the ferns come winter, but we may end up with a house full of shedded fronds and a super happy fern-crazy lady before it's all said and done :-)

Thursday, February 23, 2012

Our "Outdoor Living Room"--The Final Touches

We're anxiously awaiting the arrival of Spring in our house.  The turn of the season means plenty of yardwork (yay!) and time to enjoy our "Outdoor Living Room."

When we first bought our house, we really liked the front porch.  But I don't think we knew just quite HOW MUCH we would use it!  From March until October, we spend many evenings on the porch...we also spend quite a few weekend mornings drinking coffee, watching people walk to the Farmer's Market and reading the newspaper on our front porch.  It is literally our outdoor living room!

However, we have a few projects we want to tackle in order to make it a "complete" room!  But...we can't make a final decision so we're soliciting your input!

For starters, we need to put in some decent lighting.  I'm too embarassed to even show what we currently have as a light fixture!  It's a flood light screwed into a remnant of a ceiling-mount fixture that is covered in dead bugs...yuck!

We would prefer to hang an outdoor ceiling fan to help circulate the air during muggy months--but I'm not sure if that would look right???  Reason being, the wiring is smack-dab in the middle of the porch.  And our front door is slightly cocked to the left.  Thus, any light fixture will be about even with the right side of the door frame.


And for those of you who don't have our porch memorized yet *sarcasm*, this is what it looks like from various angles and during different seasons.


And this is the color of our fence (that's not in any of the pictures)...we want to make sure whatever we end up with coordinates with the house AND fence.

Anywho, as far as fans go--we're down to 2 options that we like.  What are your thoughts???


If a ceiling fan isn't a good fit, we'll just go with a hanging lantern. 

Here are just a FEW (hehehe) that I like...again, any thoughts/suggestions???  Do I need to go with a completely different style, maybe something more traditional?


 Aside from the lighting, we have just one more thing we want to change...the porch swing!  We love our current swing but unfortunately, it's falling a part and the paint is peeling.  I'd love to repair it, but you'd end up with a new porch swing if you tried it.  So with that, we are just going to replace it! 

This is the swing we have decided on.  Luckily, it comes unfinished so now we just have to make one last BIG decision....do we paint it white (like the one we have now)--or do we stain it to match the fence (and our dark wicker rocking chair set)???   Regardless of whatever color it ends up being, I can't wait to enjoy the ergonomic, rounded design on a beautiful Spring night ;-)


Friday, December 23, 2011

'Twas The Night Before Christmas and All Through Our House...

Not a creature was stirring, not even a mouse.

Yeah, RIGHT!

Both Justin and I were off work today so it was time to get some things done around the house!

Rather than hanging the stockings by the chimney with care, we replaced our living room ceiling fan and kitchen ceiling fixture.  They were LONG overdue for an update!

Here is the ceiling fan that came with the house--it is quite, well, ugly.


 And it just threw off the feel of the entire living room!

After making sure we had all the pieces and putting on some comfy work clothes...


We have a much improved ceiling fan!!!


And then we moved into the kitchen...and yup, another ugly light fixture!  We had put off dealing with the kitchen light because when we tried to change out the fixtures in the guest bedroom this summer, we discovered the wiring had been done incorrectly.  After numerous trips to the hardware store, LOTS of internet research and calling in the professionals, the light fixture was hung one week later.

However, we lucked out and all the wiring was correct!  It's not the most unique fixture but hey, I scored two of the "nipples" (as my brother calls them) for $10 and it looks better than what we had :-)


The lighting was one of the last updates to our kitchen.  After new paint, new window treatments (I love the bold print), shelving, tile tattoos, etc, the space feels a little more put together.  While I'm posting pictures, I might as well show you the progress thus far!

This is what the nook under our counter looked like earlier this summer:

And this is what it looks like now!  I wanted to use two boards to create three shelves, but they would have been pretty short shelves and thus nearly impossible to reach anything in the back.  Once again, it's better than it was!

For $50, we were able to change up the appearance of our backsplash with our tile tattoos.  Because of the age of our house, we were faced with a $500 fee just for having lead-based paints somewhere in the walls.  Then it would have been nearly an additional $1,000 to install new tile.  Ummmm, no thanks.  I think $50 sounds much better!


And finally, after craning our necks all day, we sat down to supper.  Thai Cashew Chicken with Sriracha Crab Rangoon!  Unfortunately, Justin can't stand nuts in his food so we really had No-Cashew Cashew Chicken.  Regardless, it was delicious.  Maybe, I'll try posting the recipe one of these days.  Until then, HAPPY CHRISTMAS TO ALL AND TO ALL A GOOD NIGHT!


Saturday, December 17, 2011

Decking the Halls...and Our Walls!

During the past few weeks, we have been busy decking the halls--and decking our interior walls! 

First on the agenda was decking the halls for Christmas!  I had purchased an amazing Pine-&-Poinsettia adorned swag to go above the front door and a coordinating old-fashioned street lamp to go by the door.  I was anxiously awaiting holiday decorating because it was going to look FABULOUS!  Then just two days later, all the Halloween decorations in our neighborhood went missing so I promptly returned the street lamp and swag to Hobby Lobby.  I should have known better than to sit out anything "loose" because the following story will prove my point:  When K-State kicked back into session this past August, a professor up the street from us had a tree stolen out of her front yard.  Yes, a tree!  It wasn't sawed off, or knocked off...using only their arms, the kids literally removed it from the ground and took off with it.  Anyhow, their antics made me realize I would have to become super creative with my outdoor decorations!

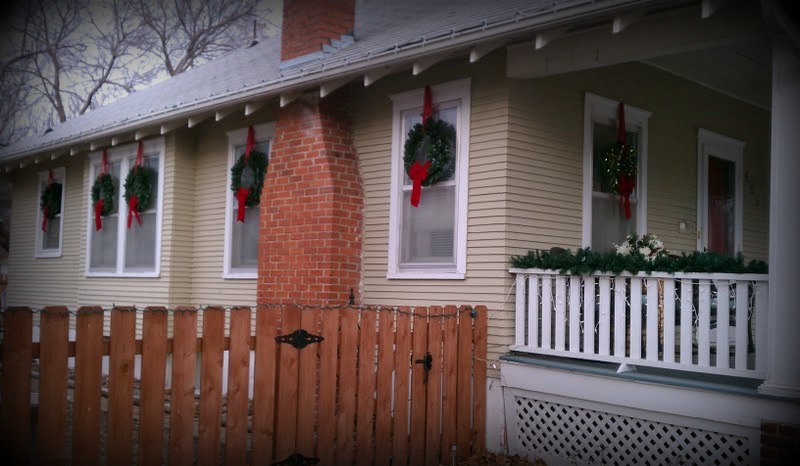
After some thinking, I decided that hanging wreaths on our windows might be the perfect solution.  After all, the potential thieves would have to enter our fence and I don't see that happening.  When Hobby Lobby had their wreaths marked down to $5, I picked up a dozen of them and talked Justin into helping me hang them one evening after work.  Honestly, I think I picked the coldest (and darkest) evening of the month to hang them.  Luckily, Justin was a good sport and went along with it.  However, my fingers were frozen solid and we called it a night before we could put the bows put on.  Finally, last weekend, I managed to tie the bows on the wreaths--I think the addition of the bows proved to be the much-needed finishing touch!


Our porch still needs some work.  I need to pick up more garland at the After-Christmas sales so I have enough to drape it on the railings next year...the straightness of this year's garland drives me nuts!  I also want a tall, skinny tree to go by the front door but I can't figure out how to tastefully secure it to the porch.  But in the meantime, I hope this little arrangement will bring a burst of color to our drab porch!  I picked up all the supplies at Jo-Ann's for a little bit of nothing and it came together pretty quickly.  The red things (whatever they're supposed to be) are super-glittery and look awesome when the sunlight hits them!


Last Saturday morning, we finally installed a hood over our stove.  The hood had been sitting in our basement for almost a year!  Last winter, we decided we were going to overhaul our kitchen and for whatever reason, we went ahead and bought the hood.  Needless to say, the overhaul didn't happen and I was finally tired of the hood collecting dust in our basement.

This is what the "stove area" of our kitchen looked like when we bought the house about 21 months ago:

And this is what it looks like now!  New stove, new flooring, new wall paint, running of additional wiring (can't see that part!) and the stainless steel hood.

It didn't dawn on us until we went to hang the hood, but the cabinets on that wall are all super deep.  Upper cabinets are generally 12" deep--but these cabinets measured 24" deep...meaning a previous owner hung "lower" cabinets as "upper" cabinets...???  Don't get me wrong--the extra cabinet depth allows for tons of storage space.  However, we realized that if we hung the hood flush with the front of the cabinets, the front of the hood would have stuck out far enough that we could not easily see nor reach the back burners.  If either one of us were shorter, it wouldn't have been such an issue.  Thus, we ended up installing the hood flush with the back of the cabinetry and thankfully, it doesn't look too out of place.

The last project on our agenda involved the long wall in our living room.  After  ayear of looking and months of saving up, I ordered some wall art that looked gorgeous in the catalog. After hanging the first set, I broke down and bought a laser level--it made the second set MUCH easier to hang!  I don't want to sound like a Negative Nancy, but the collage was not worth the money--the frames aren't square and don't lie flat, causing them to look a little uneven on the walls.  But hey, it was the best find for the amount of money I was able to spend, so I'll just live with them!

Thursday, December 1, 2011

The Big Reveal--Our Christmas Tree Urn!

As promised in my LAST POST, here is the "big reveal" of the Christmas tree urn that I made!  I ended up using Justin's phone to take the pictures so please bear with me.

From the front...


From the side...


Close-up of the base...

Compared to last year, our Christmas tree has much more of the "wow" factor that I was looking for.  It's still not the "department store" level of decorated tree that I've been striving for, but it's getting closer.  In fact, using the "urn" also gave us a couple extra inches of much-needed height.  Because this house has high ceilings, the tree looks unproportionally short compared to the rest of the space.  The oversized angel doesn't help make it look any taller, but I like my black Angel.  She's pretty...and it was quite amusing to walk around the mostly-white store with my black Angel in hand!  But anyhow, maybe I'll be able to track down a taller--and more realistic--tree during the after Christmas sales.  Regardless, I think the urn still turned out pretty well!

Tuesday, November 29, 2011

My Crazy Idea for a Christmas Tree "Planter"

During our first year of "shacking," Justin and I decided we wanted a Christmas tree.  Even though we were living in sin, we were super excited about decorating our duplex in celebration of baby Jesus.   In all honesty, it probably had more to do with the fact that I love to decorate and I finally had some one to split the cost with ;-)

Fortunately, our local Tru Value was running an incredible deal on an artificial, pre-lit tree that year. We went to the store and left with "our" very first Christmas tree!  It wasn't the most realistic tree that a person could buy, but it fit our budget.  Next on our list was a quick-trip to Walmart for some decorations and Hobby Lobby for the tree skirt.

Several years later and I would love to have a new--more realistic looking--Christmas tree.  Only problem?  I don't have new Christmas tree money!  I have completely stopped walking past the display of Christmas trees at all the stores because if I see something, I'm reallllllllllllllllly bad about justifying why I need it.

However, I can thank Ballard Designs for coming to the rescue and inspiring me to "renew" the look of our tree.  Last year, they featured all these amazing tree planters/urns in their catalogs.  I had never seen such a thing before and was in awe--I loved how they were a bit unexpected but also didn't take up as much floor space as a traditional tree skirt.


The catch? They start at $100 (without shipping) and never go on sale.

Knowing there was no way I could buy one, I decided I would figure out how to make one on my own.  Starting this Fall, I stalked Home Depot until their planters went on clearance.

For $30, I picked up a green urn almost identical to the image shown just above ^.   Now I just had to patiently wait until Christmas was close enough to start experimenting with my crazy idea.

After 40 pounds of quick-setting concrete (which came at no cost due to our Ace Preferred Customer reward points), Vasoline, saran wrap, a blow dryer, 3 patio chairs and an evening of 35 degree weather, I now have my Ballard Design-inspired urn at a third of the cost :-)


Thus far, the planter is working out GREAT!  And no, I'm not quite ready for the big reveal ;-)  Unforunately, our Christmas decorating is taking much longer this year.  If I ever finish decorating the tree, I'll be sure to post a picture of the final product!

In case you're interested, here's a somewhat basic guide to making your own planter:
--Track down a fiberglass pot.  Don't use a ceramic or terra cot pot as it will become too heavy!  Ballard's now carries a wooden, square pot that is really neat--if you like this look, just make sure the planter has some type of liner.
--Find yourself somebody strong to help carry the heavy stuff and do all the stirring.
--I took the bottom part of our Christmas tree and decided how far down in the pot it needed to go.  Luckily, a 40-lb bag of cement made enough to reach the level I wanted.
--Wrap the base of your tree in Vasoline and wrap with Saran Wrap.  If the tubing is hollow, make sure you also cover the opening.  The saran wrap and vasoline will guarantee that you will be able to remove the tree from the dried cement.
--Mix the concrete in the planter per the directions on the bag.  Make sure your planter does not have an open hole in the bottom when you do this!  Once the concrete is mixed, insert your tree into the gooey stuff and find a way to hold the tree in place.  I used our 3 old patio chairs.  Quick-crete takes a while to set and you don't want to be there overnight.  Apparently, using a blow-drier does NOT speed up the process.  Also, make sure the air temperature is not too cold.
--After 24 hours, the cement should be cured and you're good to go!

Friday, October 7, 2011

Craigslist "Deal" of the Day

If you know much about me, you'll know I'm a Craigslist junkie...and I mean JUNKIE!!!  I even have an app on my phone that allows me to enter what I'm looking for and whenever someone posts the item, it sends me an alert.  Awesome!

As of late, I haven't had much time to cruise Craigslist...and that's really the only way you get the good stuff.  The whole "early bird gets the worm" phrase couldn't be any more true when it comes to Craigslisting!

Not long after we moved into our house, I spied an incredible vintage yellow metal glider on a porch just down the street from us.  I may have even made Justin drive by it one time just so I could show him...with the intent of maybe trying to talk him into asking the people if they would sell it.

It didn't work.  He thought it was kinda creepy to go ask someone to sell their porch furniture.  He was probably right! 

Months later, Mom saw the newest Grandin Road catalog laying on our dining room table and she mentioned she really liked the metal gliders as well.  Guess it's true--like mother, like daughter!

Fast forward to yesterday and guess what I saw on Craiglist...this beautiful--but worn--metal glider!


The seller was in Junction City, about 20 miles away, and was asking $75 for it.  It needed repainted (obviously) but they lost interest in the project and wanted to free up some space.

I called right away and I'm not kidding--they had JUST sold it.  More proof that the early bird gets the worm!  If only I had known I was in the market for a metal glider, I would have updated my app ;-)

At $75, whoever went home with the glider is a lucky person.  What would I have done with it???  Paint it, of course, and put it on our back patio!  Or, maybe with the holidays coming up, I would have given it to my mom for Christmas.  Some people aren't too keen on giving "used" items as gifts but hey--it would have beat her Mother's Day gift from about 23 years ago...washcloths and bars of soap FROM her own bathroom.  As a broke 5-year old, it was the best I could do :-)

Anyhow, to wrap things up--my "luck" didn't lead to a deal of a day...but rather the deal that got AWAY!

With a fresh coat of paint, the glider could have looked like this sweet baby!

Thursday, September 29, 2011

Decorating for Fall

I finally pulled out all our fall decorations this past Sunday...

Last year, I bought a few decorative "stakes" for our flower beds and put pumpkins on the porch steps...and the decorating was done!

This year, we have an additional 30-some feet of flowerbeds to decorate...and the amount of decorations we had from last year just seemed bare.

A quick trip to Jo-Ann's for their Fall Decor sale and I had enough decorations to get the job done!


I thought this pillow was kinda cute...and was nice way to bring some more orange onto the porch!

After taking the picture, I realized a pot of purple Asters would look great placed next to the chair! 

Pumpkins on the stairs are becoming our Fall decorating tradition! 

This year I added a leaf garland to the porch railing for an extra pop of color...It was way cheaper than buying a bunch of yard stakes for the original flowerbeds :-)

Yay for color!!!

Some of our yard stakes...

And more yard stakes...

Yard stakes on the other end of the flower bed...
I ended up running back to the store for these 2 sunflowers...with the other flowerbed having all the stakes, this side was a bit unbalanced.  Now it's not!

I'm not going to lie--my anxiety has skyrocketed since we put the decorations up on Sunday.  I'm not worried about them being "good enough" because honestly, we're the only ones on our block who decorate for the holidays/seasons.  Rather, I'm worried some punk is going to walk off with the yard stakes or decide to smash the pumpkins :-/  Because really, who wants to go clean up a bunch of smashed pumpkins?!  Anyhow, it makes no sense to worry because last year, nothing happened to the decorations--so here's to hoping that they'll stay in their place again this year!